Setting Up VMware Workstation Pro 17 with Active Directory on Windows Server 2025


Set up Active Directory on Windows Server 2025 using VMware Workstation Pro 17 by installing the software, configuring the VM, installing Windows, adding AD and DNS roles, and setting a static IP.
overview
VMware Workstation Pro 17 is a powerful tool for virtualization that allows you to run multiple operating systems on your physical computer. In this blog post, we'll walk through the process of setting up Active Directory (AD) on Windows Server 2025 using VMware Workstation Pro 17, along with additional configurations for security, and networking.
1. Setting Up VMware Workstation Pro 17
Download and Installation:
- Visit the Broadcom Support Portal to download VMware Workstation Pro 17.6, which supports Windows Server 2025.
- Run the installer as an administrator. Follow the installation prompts by clicking "Next", accepting the license agreement, and choosing whether to participate in the VMware Customer Experience Improvement Program.
- Complete the installation by clicking "Install" and then "Finish" once it's done.
Create a New Virtual Machine:
- Launch VMware Workstation Pro.
- Click on "File" > "New Virtual Machine".
- Choose "Typical (recommended)" and click "Next".
- Select "Installer disc image file (iso)" and browse to your Windows Server 2025 ISO. Click "Next".
- Enter a name for your VM, choose where to save it, and click "Next".
- Set the maximum disk size (e.g., 60GB), choose "Store virtual disk as a single file", and hit "Next".
- Review your settings and click "Finish".
2. Install Windows Server 2025
Start the VM:
- Click on your newly created VM and select "Power on this virtual machine".
- When prompted, press any key to boot from the CD/DVD.
Installation Process:
- Choose your language, time, and currency format, then click "Next".
- Click "Install now".
- If you don't have a product key, select "I don't have a product key" and choose the edition (e.g., "Windows Server 2025 Standard").
- Accept the license terms and click "Next".
- Choose "Custom: Install Windows only (advanced)".
- Select the drive where you want to install Windows (usually "Drive 0 Unallocated Space") and click "Next".
- Wait for the installation to complete, then set up your administrator password and any other initial configurations.
3. Configure Active Directory on Windows Server 2025
Add AD DS and DNS Roles:
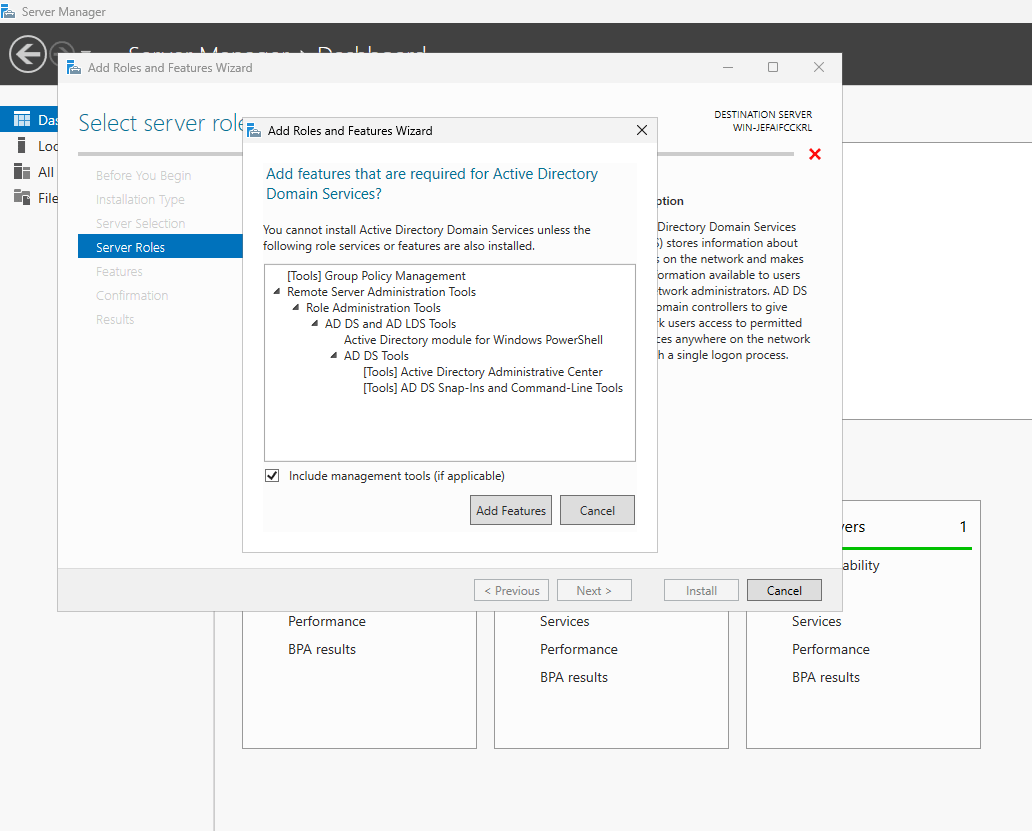
- Open Server Manager, click "Add roles and features".
- In the wizard, click "Next" until you reach "Server Roles". Check "Active Directory Domain Services" and "DNS Server". Install any required features and click "Next" until you can click "Install".
Promote to Domain Controller:
- Back in Server Manager, a yellow notice will appear; click on "Promote this server to a domain controller".
- Choose "Add a new forest", enter your domain name (e.g., example.com), and click "Next".
- Set the Domain Controller Options, choose a Directory Services Restore Mode password, and proceed through the steps by clicking "Next".
- Review your selections and click "Install". Your server will restart after installation.
4. Change Your Windows Server 2025 IP
Configure Network Adapter:
- Open "Network and Sharing Center" from Control Panel.
- Click on "Change adapter settings", right-click your network adapter, and select "Properties".
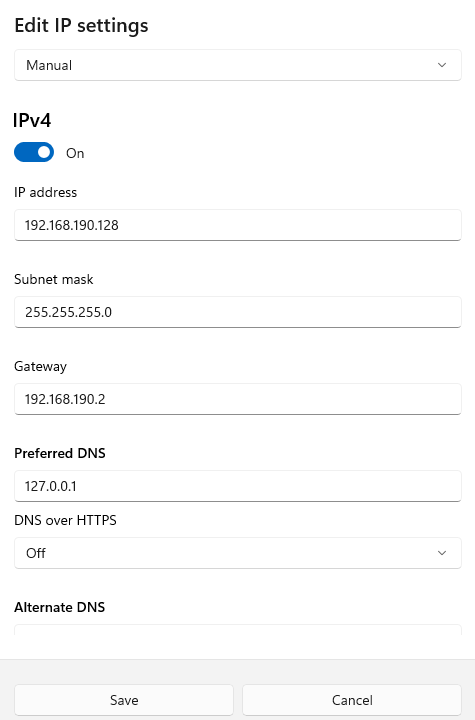
- Select "Internet Protocol Version 4 (TCP/IPv4)", click "Properties", and manually enter your desired static IP, subnet mask, default gateway, and DNS server addresses.
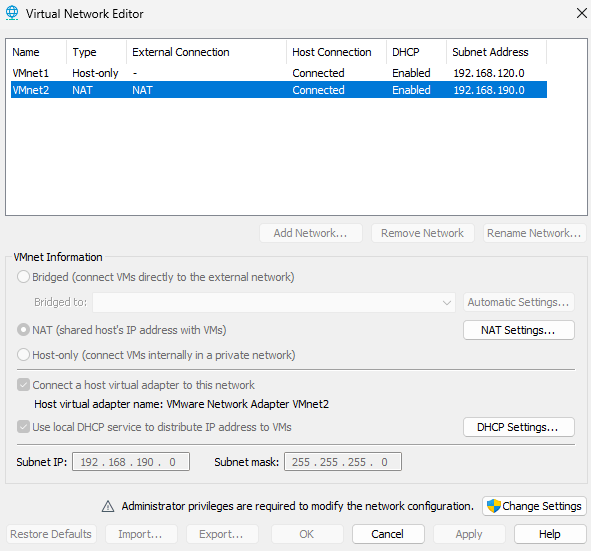
Configure NAT in VMware Workstation
- Open Virtual Network Editor via Edit >
- in the menu.
- Select or create a NAT network (e.g., VMnet#). If needed, click Add Network and assign it to NAT.
- Configure NAT Settings with the desired subnet and gateway (e.g., 192.168.1.0, 192.168.1.1).
- (Optional) Adjust DHCP Settings to match the NAT subnet.
- Save changes and set each virtual machine’s Network Adapter to NAT in its settings.
5. Windows Server 2025 File and Folder Sharing
Setup Sharing:
- Navigate to the folder you want to share, right-click, select "Properties", then the "Sharing" tab.
- Click "Advanced Sharing", check "Share this folder", and set permissions for users or groups. Click "Apply" then "OK".
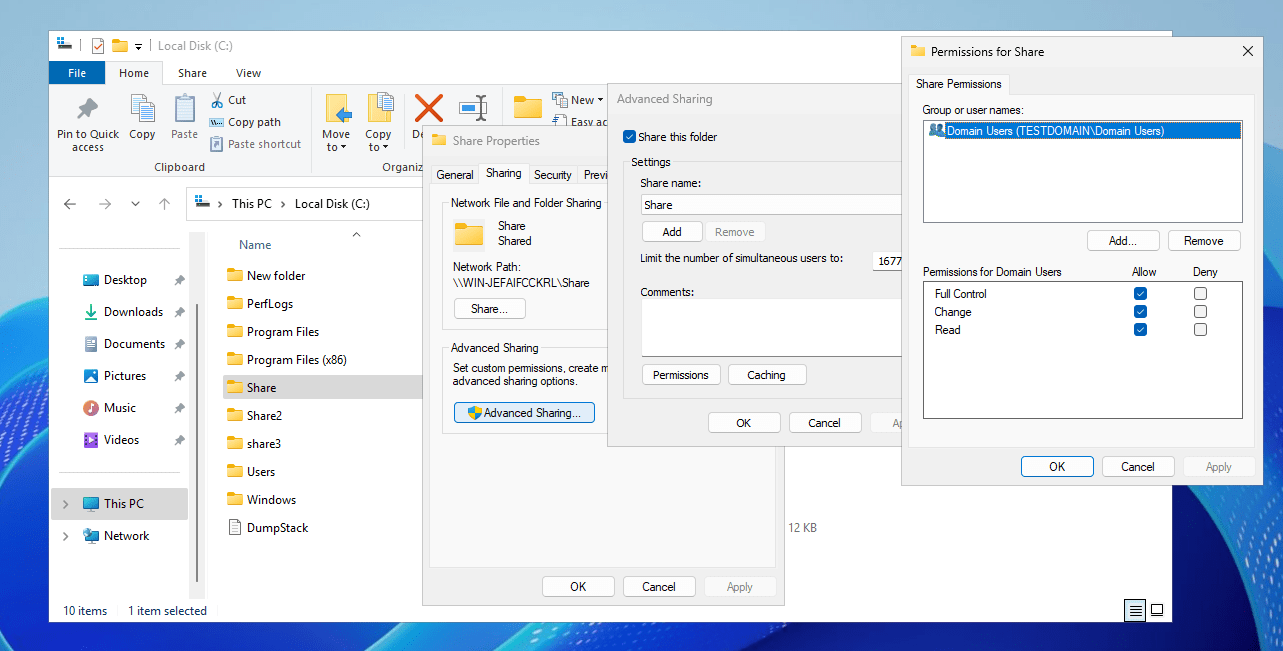
TipFor security settings, right-click the folder, go to Properties > Security, adjust permissions for users or groups, and apply changes.
Conclusion
Setting up Active Directory on Windows Server 2025 within VMware Workstation Pro 17 provides a robust environment for managing network resources efficiently. This guide covers the essentials from installation through to basic configuration, ensuring you have a solid foundation for your server infrastructure. Remember, consistent monitoring and updates are key to maintaining a secure and performant AD environment.
References
For further reading and detailed guides, here are some useful links:
New Active Directory features in Windows Server 2025 - Learn about the latest enhancements and security features.
VMware Workstation 17.6 Pro Release Notes - Check for compatibility with Windows Server 2025.

