How I Deployed My Website Using Azure Static Web Apps

When building a home lab to deploy a website, I decided to explore Azure Static Web Apps, a service that simplifies hosting web applications, with seamless integration to GitHub for continuous deployment. Here’s a walkthrough of the process and my experience setting up the deployment pipeline.

Why Azure Static Web Apps?
Azure Static Web Apps are optimized for modern static site generators like Next.js, Hugo, and Jekyll, and it’s a perfect choice for projects with front-end frameworks. It’s a managed hosting service that takes care of scaling, SSL, and globally distributed content delivery, reducing the need to manually configure these aspects.
Step 1: Setting Up the Azure Static Web App
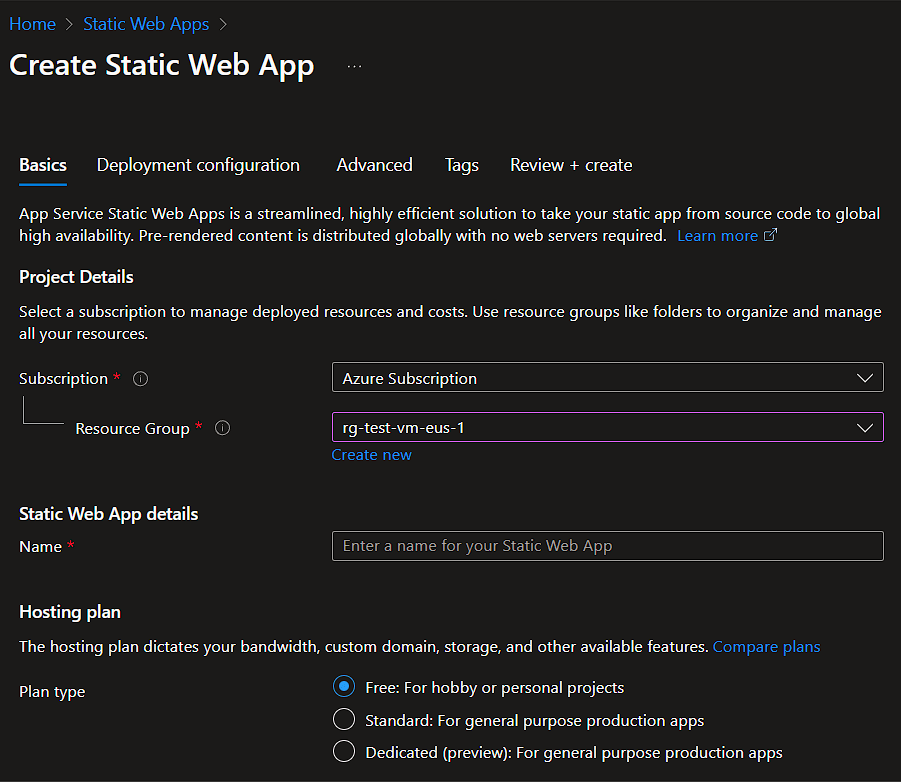
After logging into my Azure portal, I followed these steps:
- Create a Resource Group: I organized my resources by creating a dedicated resource group for the project. This step is helpful for managing costs and keeping all project components together.
- Resources: This section was critical and included the following sub-sections:
- Name: I chose a unique name for my web app.
- Region: I selected a region close to my primary user base to optimize performance
- Plan Type: I selected the Free plan, which offers ample resources for development and testing.
Step 2: Connecting to GitHub
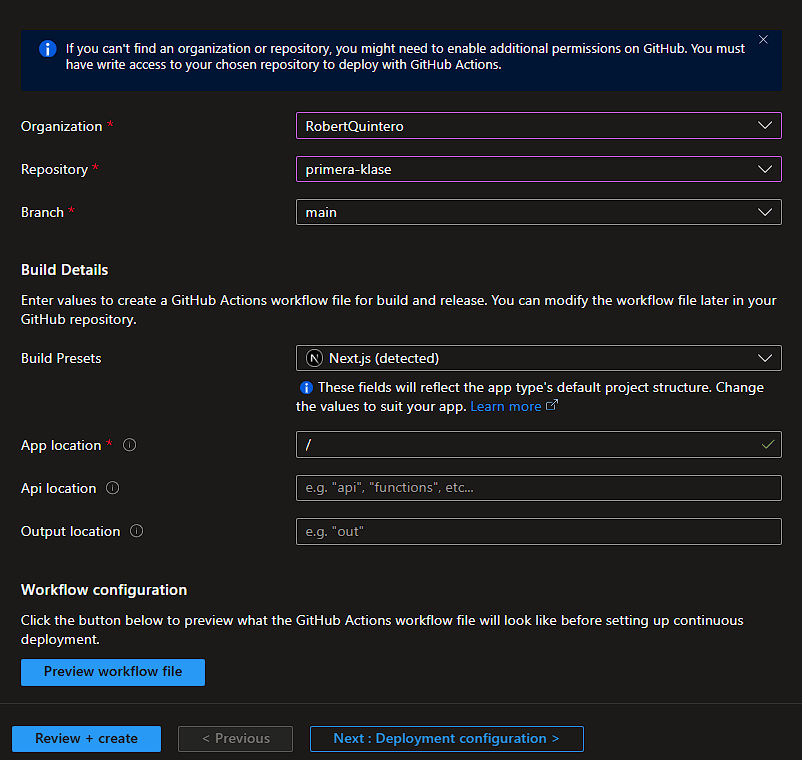
Azure Static Web Apps provides a straightforward GitHub integration, enabling continuous deployment with GitHub Actions. After creating the app, I connected it to my GitHub repository, where I store my site’s source code. Azure generated a workflow file for GitHub Actions, which defined the steps needed to build and deploy the app automatically.
Step 3: Configuring GitHub Actions
Azure’s auto-generated GitHub Actions workflow made deploying a breeze. In the YAML file, I made a few customizations to fit my project structure:
- Define the Build Command: I specified the command that builds my project for production.
- Set Output Path: I defined the output directory, pointing to where my site files would be placed after the build.
workflow
name: Azure Static Web Apps CI/CD

on:
  push:
    branches:
      - main
  pull_request:
    types: [opened, synchronize, reopened, closed]
    branches:
      - main

jobs:
  build_and_deploy_job:
    if: github.event_name == 'push' || (github.event_name == 'pull_request' && github.event.action != 'closed')
    runs-on: ubuntu-latest
    name: Build and Deploy Job
    permissions:
       id-token: write
       contents: read
    steps:
      - uses: actions/checkout@v3
        with:
          submodules: true
          lfs: false
      - name: Install OIDC Client from Core Package
        run: npm install @actions/core@1.6.0 @actions/http-client
      - name: Get Id Token
        uses: actions/github-script@v6
        id: idtoken
        with:
           script: |
               const coredemo = require('@actions/core')
               return await coredemo.getIDToken()
           result-encoding: string
      - name: Build And Deploy
        id: builddeploy
        uses: Azure/static-web-apps-deploy@v1
        with:
          azure_static_web_apps_api_token: ${{ secrets.AZURE_STATIC_WEB_APPS_API_TOKEN_GREEN_SAND_0189C450F }}
          action: "upload"
          ###### Repository/Build Configurations - These values can be configured to match your app requirements. ######
          # For more information regarding Static Web App workflow configurations, please visit: https://aka.ms/swaworkflowconfig
          app_location: "/" # App source code path
          api_location: "" # Api source code path - optional
          output_location: "" # Built app content directory - optional
          github_id_token: ${{ steps.idtoken.outputs.result }}
        env:
          NEXT_PUBLIC_SANITY_PROJECT_ID: ${{ secrets.NEXT_PUBLIC_SANITY_PROJECT_ID }}
          NEXT_PUBLIC_SANITY_DATASET: ${{ secrets.NEXT_PUBLIC_SANITY_DATASET }}
          NEXT_PUBLIC_RESEND_API_KEY: ${{ secrets.NEXT_PUBLIC_RESEND_API_KEY }}
          NEXT_PUBLIC_UPLOADTHING_SECRET: ${{ secrets.NEXT_PUBLIC_UPLOADTHING_SECRET }}
          NEXT_PUBLIC_UPLOADTHING_APP_ID: ${{ secrets.NEXT_PUBLIC_UPLOADTHING_APP_ID }}


          ###### End of Repository/Build Configurations ######

  close_pull_request_job:
    if: github.event_name == 'pull_request' && github.event.action == 'closed'
    runs-on: ubuntu-latest
    name: Close Pull Request Job
    steps:
      - name: Close Pull Request
        id: closepullrequest
        uses: Azure/static-web-apps-deploy@v1
        with:
action: "close"Step 4: Deploying the Website
With the GitHub Actions workflow in place, each time I pushed changes to the main branch, GitHub Actions would trigger a new deployment. The workflow:
- Clones the repository,
- Installs dependencies,
- Builds the application,
- Deploys it to Azure.
Step 5: Configuring Custom Domain and SSL
Azure Static Web Apps offers an easy way to configure a custom domain and automatically issues an SSL certificate. I mapped my domain to the web app and enabled HTTPS without needing to manage certificates manually.
TipSetting up my website with Azure Static Web Apps allowed for a seamless CI/CD process, automatic SSL, and high performance. It’s ideal for projects that rely on front-end frameworks and require quick, reliable deployments.
If you’re working on deploying a static or client-rendered site, I highly recommend trying Azure Static Web Apps. The integration with GitHub, scalability, and ease of management make it a great choice for developers who want to focus on building rather than infrastructure.